Deploy and Run a Containerized Web App with Azure App Service
Today we are going to talk about the "how to deploy and run a Containerized Asp.net Core Web App with Azure App Service"?It'll be great if you a basic understanding of the followings:
- You should have basic knowledge about the Azure App Service
- .Net and Visual Studio
- Docker and Containerizations
Development Env Setup
- You need Azure subscription (if you don thave then get a free one)
- You need Visual Studio 2019, click here to download
- You need to install docker on your local dev Machine
We shall complete the whole exercise in next 4 steps only
Step 1: Create Azure Container Registry
Go to the Azure portal and click on Create New Resource>>Containers and Click on the Container RegistryFill up the Create Container Registry Form, and also Enable Admin User and click on Create Button. see below for your reference
finally, your registry container will be created with the given name.
Step 2: Visual Studio 2019 -Create a Web App
Open Visual Studio 2019 and Click on "Create a new project"Select "ASP.NET Core Web Application"
Provide the project name
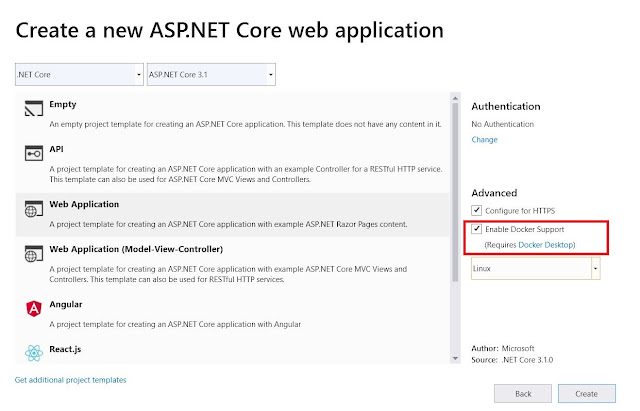
Tick the "Enable Docker Support" checkbox and click on Create Button
Here you must have the running Docker on your machine same you can see just below the "Enable Docker Support" checkbox
Setup 3: Publish Web Application
Complete the following steps to send your web application contents to Azure Container Registry, which uses the instructions in the Docker file to build the image and store it.Right Click on Solution and Click on Publish >> Start >> Container Registry >> Select Existing Azure Container Registry and then click on Create Profile button, Here is a screenshot for the reference
May it ask to login, so use your azure portal credentials to login purpose here.
Now Select the recently(in step 1) created Azure container registry.
Click on the OK button and wait for the few minutes it will publish apps images/binary to Azure Container Register and you can validate with the same like the following screenshot:
Step 4: Create a Web App for Containers
Click in Create New Resources and sear for the "Web App for Containers"Fill up the form with all the required field Here is a screenshot for your reference
Click on "Next: Docker >" button and fill Azure container registry options details according to above created in step 1
Click on "Review + Create" button and finally you will the below screen, review the provided data and click on Create button
Wait for the few minutes and your app will be provisioned and ready to use
finally, visit your web app URL to see your first running web in the container.
Once the deployment is completed visit your web app explores the URL to see the running application


No comments:
Post a Comment