Azure Active Directory- Restrict Application Access To Users or A Group
This article will show, how you can restrict your app for the give users/group only. Once you are done with app registrations then you can use the Enterprises Application sections to provision access to allowed users only or users existing under the group.
Azure Ad Group
Azure Active Directory offers a mechanism to use groups to manage access to cloud-based web apps, on-premises apps, and other resources. For example Software as a Service (SaaS) apps, Azure services, SharePoint sites, and on-premises resources.
See this Angular 8 App With Azure Active Directory Authentication post for the step by step registrations flow if you are not aware.
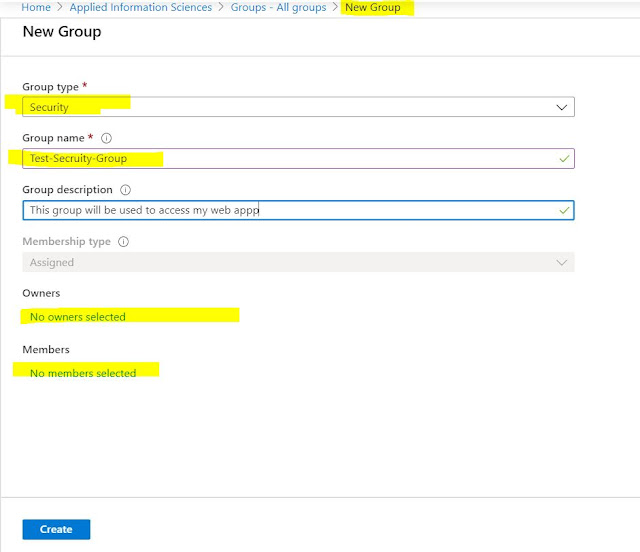
Create an Azure Ad Group (Security):
- Log in to the Azure portal with an administrator account if you are not admin then take help from your concern admin team. (mostly normal user can not create the group)
- Click on the All services item on the main menu or Find Azure Active Directory in the left panel.
- Choose the directory you are using for the application.
- Choose Groups >> New Group
- Choose the Group Type to Security
- Provide a meaning full group name
- Add users under the member's sections that you are going to allow to access your application
- Click on Create button
How to Configure the Application?
Follow the following steps to configure your app:
- Log in to the Azure portal with your account(an administrator account will be required but you can take help from your Cloud Admin/DevOps Team) or as an owner of the app under Enterprise apps.
- Click on the All services item on the main menu or Find Azure Active Directory in the left panel.
- Choose the directory you are using for the application.
- Click on the Enterprise applications tab.
- Select your application from the list of applications associated with this directory.
- Click the Properties tab.
- Change the User assignment required? toggle to Yes.
- Click the Save button at the top of the screen.
Assign Group to App
- To assign group(s) to an application directly, follow the steps below:
- Open the Azure portal and sign in as a Global Administrator or as a non-admin application owner with an Azure AD Premium license assigned is required
- Select “Azure Active Directory” in Left Panel to open.
- Click Enterprise Applications from the Azure Active Directory left-hand navigation menu.
- Click All Applications to view a list of all your applications and filter with your app name
- Select the application you want to assign a user to from the list.
- Click Users and Groups from the application’s left-hand navigation menu.
- Click the Add button on top of the Users and Groups list to open(filter your group name) the Add Assignment pane.
- Click the Users and groups selector from the Add Assignment pane.
Grant tenant-wide admin consent to an application :
Admin consent will be required because the application will be reading the user profile on behalf of the user. Only Global admin can grant the admin consent.
Visit MSDN for more information around the Admin consent.


No comments:
Post a Comment