Azure Key Vault With .Net Framework 4.8
I was asked to migrate
asp.net MVC 5 web application to Azure and I were looking for the key vault
integrations and access all the secrete out from there.
Azure Key Vault Config Builder
Configuration builders for ASP.NET are
new in .NET Framework >=4.7.1 and .NET Core >=2.0 and allow for pulling settings
from one or many sources. Config builders support a number of different sources
like user secrets, environment variables and Azure Key Vault and also you can
create your own config builder, to pull in configuration from your own
configuration management system.
Here I am going to
demo Key Vault integrations with Asp.net MVC(download .net framework 4.8). You will find that it's magical, without code, changes how your app can read secretes from the key vault. Just you have to do the few configurations in your web config file.
Prerequisite:
Following resource are
required to run/complete this demo
·
Azure subscription
o Create an Azure web
app
o Create a key vault
resource
§ Add a couple of secretes
·
Visual studio 2019 ready to use on your machine
·
.Net Framework 4.8 installed
Configuration Details
I have ready
code/running for you that you can download code from Git Hub
The NuGet package “Microsoft.Configuration.ConfigurationBuilders.Azure”
version 2.0.0. It will facilitate to access the give secretes from the azure key
vault. when you will install this package it will install all the required other packages.
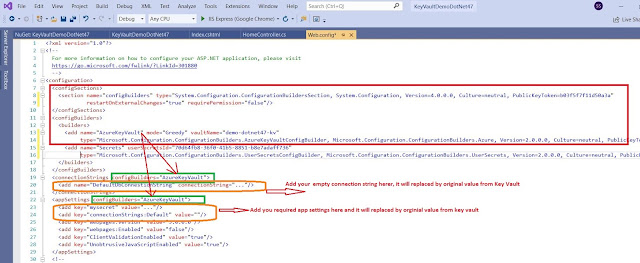
When you will install it will make the following changes in your web.config file. you need to update your key vault name here.
<add name="AzureKeyVault" vaultName="demo-dotnet47-kv"
- Above highlighted key vault name you need to replace with yours once.
if you want to render and read connection string to decore with
<connectionStrings configBuilders="AzureKeyVault">
if you want to render your app setting from key vault so decorate with same like connection sting you can see the highlighted in green color
You need to add the empty connection string and add secrete with the same name, see the highlighted items in orange color
Let's see the Key Vault and Secretes
If you are new to the azure key vault please visit this tutorial so learn around and provision steps
here is the one that we have used in this demo.
If you are running the app from your local machine so make sure that you logged with the same principle(user Id) that you added under the azure key vault access policy otherwise your app will be unable to access the secretes
if you are running you this demo after publishing the azure web app, make sure that you have added Managed Identity on and you have granted access to it under key vault access policy.
in this demo we are trying access only below highlighted secretes from key vault no all because of the default config builder behavior mode="strict". if you want to read/add all the secrets then set up the mode = "Greedy" in the above config file
<add name="AzureKeyVault" mode="Greedy" vaultName="demo-dotnet47-kv"
Key Vault Access Policy Settings
Managed Identity setup for your web app:
Asp.net MVC 5 Code and Neuget Packages Details
once you will download this code from Git Hub, you will notice the following changes
NuGet Packages:
Code demo to read secretes:
Show these values on view: not best practices its a just for the demo and with demo secretes.
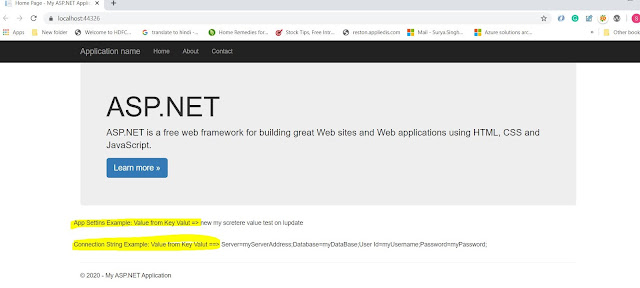
Finally, we have done with all the required changes so let's run the app and see the result.


No comments:
Post a Comment