Azure SQL Database connection from App Service using a managed identity
Azure App Service(Web App) provides a highly scalable, self-patching web hosting accommodation in azure. It offers a managed identity for your app, which is a turn-key solution for securing access to the Azure SQL database and other azure services. Managed identities in-app provides a mechanism to your app more secure by eliminating secrets from your app, such as credentials in the connection strings.
Here we'll integrate managed identity to the sample web app and also with zero lines of code. we'll utilize full configuration capability to make a connection to the Azure SQL database.
Prerequisites:
Following resource are required to
run/complete this demo
- Azure subscription
- Create an Azure web app
- Create a key vault resource
- Visual studio 2019 ready to use on your machine
- .Net Framework 4.8 installed
You will learn followings:
- Enable managed identities
- Grant SQL Database access to the managed identity
- Connect to SQL Database from Visual Studio using Azure AD authentication
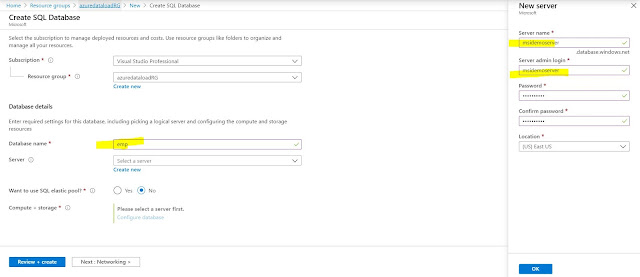
Azure Database Setup
Let's create a database for you according
to give screenshot
Setup Azure Active Directory
Open you newly create azure SQL server and add your email id(that
you have used to login to azure portal)
Open Azure Database(for
example: emp) and click on Query Editor(Preview) on and log-in with the option “Active
Directory authentication” and run following command
Grant Access to your Web App to Azure SQL Database
This step is not required for the local running the app in visual studio
CREATE USER [<identity-name>] FROM EXTERNAL
PROVIDER;
ALTER ROLE
db_datareader ADD MEMBER [<identity-name>];
ALTER ROLE
db_datawriter ADD MEMBER [<identity-name>];
ALTER ROLE
db_ddladmin ADD MEMBER [<identity-name>];
GO
[<identity-name>] :
Your web app Identity that will be required only when your code hosted over
underlying web app to make the connection between an azure web app and your emp database.
Set up Local Develop Environment(Visual Studio)
You must be
login into the visual studio with same principle/user name that you have used to access https://portal.azure.com/
- To enable development and debugging in Visual Studio, add your Azure AD user in Visual Studio by selecting File > Account Settings from the menu, and click Add an account.
- Add latest Nuget Package “Microsoft.Azure.Services.AppAuthentication” to your underlying project
- Open your Web.config, file and the following configurations
<configSections>
<section name="SqlAuthenticationProviders" type="System.Data.SqlClient.SqlAuthenticationProviderConfigurationSection,
System.Data, Version=4.0.0.0, Culture=neutral, PublicKeyToken=b77a5c561934e089" />
</configSections>
<SqlAuthenticationProviders>
<providers>
<add name="Active Directory Interactive" type="Microsoft.Azure.Services.AppAuthentication.SqlAppAuthenticationProvider,
Microsoft.Azure.Services.AppAuthentication" />
</providers>
</SqlAuthenticationProviders>
<connectionStrings>
<add name="BasicDatabaseConnectionString" connectionString="server=msidemoserver.database.windows.net;database=emp;UID=ManagedIdentity;Authentication=Active
Directory Interactive" />
</connectionStrings>
Note: update the connection string with your Azure SQL server name and database
Sample web.config file:
You're now
ready to develop and debug your app with the SQL Database as the back end,
using Azure AD authentication.
Let's run from your local machine and if your running given sample code(Download Sample Code from Git Hub) so you will see the following screen:
Please provide your comment and feedback, that'll be highly appreciated.


No comments:
Post a Comment